At AccuLynx, we want to make sure our software meets the most essential needs of your roofing business. So we’re always introducing new improvements to our features to help them work more effectively for you.
One of the improvements we’re working on is an overhaul of our financial tools in the Contract Worksheet area of the AccuLynx job files. As part of the process of updating these tools, we’ve added an option to “test drive” two of them: Financial Worksheet and Invoice Worksheets. AccuLynx users can test out these features by navigating to the Contract Worksheet in any job file. The test drive uses real job information, but it won’t impact any active jobs—it’s just a chance for you to explore the new tools and experiment with how they can benefit your business.
Using The New Financial Worksheet

Here are a few ways to use the new Financial Worksheet that you can test out now:
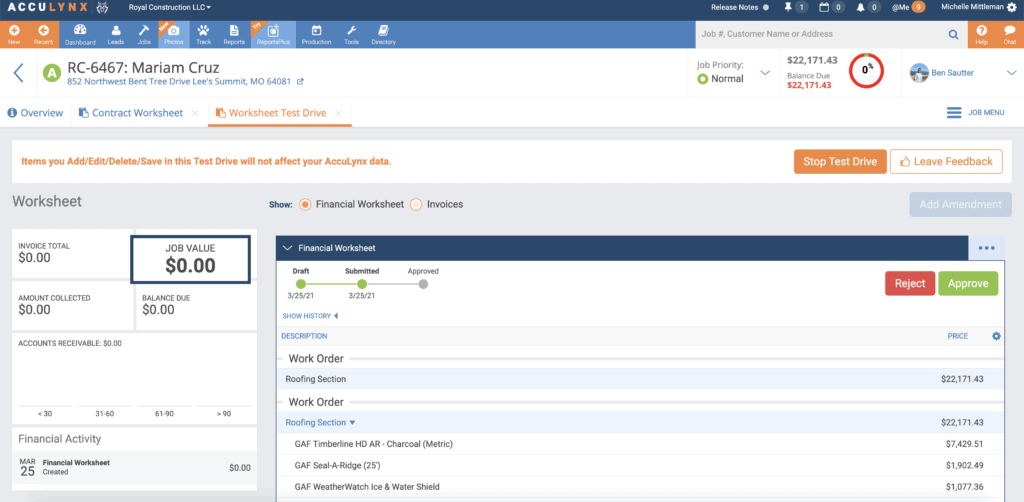
- Import data from the primary job estimate. Use the three-dot menu to import data from a job estimate into the Financial Worksheet. You can select which items you would like to import.
- Customize your display and add sections. You can rearrange and organize the default sections in your Financial Worksheet to fit your company needs. You can also add new sections for upgrades, change orders, discounts, work not doing, or a custom reason.
- Control your view. Selecting the gear icon allows you to add or hide data within the Financial Worksheet. You can view or hide cost, price, and more.
- Drag and drop to reorder items. To move items around on the Worksheet, just click and hold on the set of squares on the left side of the row, then place it wherever you’d like. Rows that have sub-items associated with them will drag and drop together.
- Add amendments. If you need to change your Financial Worksheet after it’s approved, you can add an amendment to update the information without altering the original Worksheet. Amendments have their own approval process, so you won’t have to reapprove work that is already underway.
Using the New Invoice Worksheet

You can access the Invoice Worksheet test drive from the same location as the Financial Worksheet test drive. Try out these actions in the test drive to see how the Invoice Worksheet can help your business:
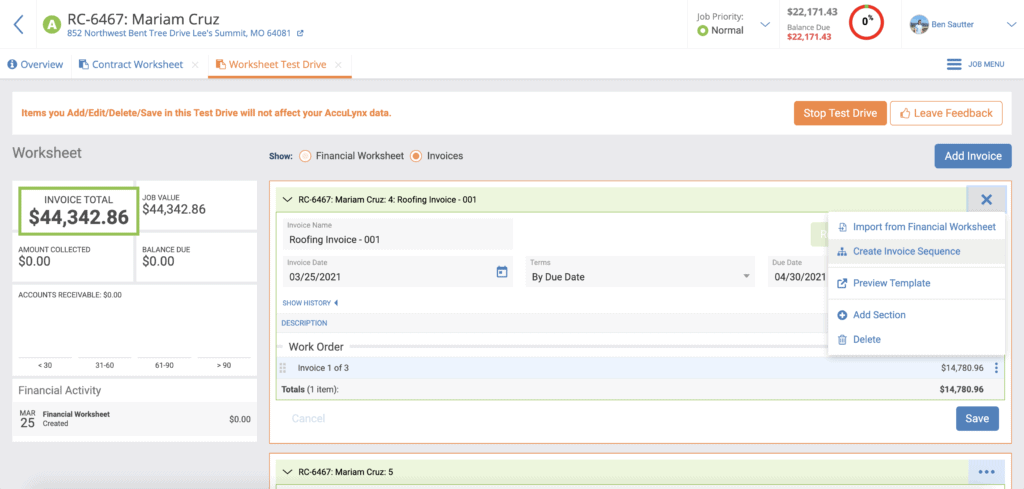
- Add data to the invoice from the Financial Worksheet. You can choose the data that’s used to create the Invoice Worksheet. Select “Invoice in Full” to pull in everything from the existing Financial Worksheet. If you only want to invoice a specific section or individual items, select “Import From Financial Worksheet”.
- Create an invoice sequence. Clicking “Create Invoice Sequence” allows you to divide your invoice into sections that can be billed separately. Selecting “Invoice for each section” creates an individual invoice for each one of your worksheet sections, while selecting “Equal percentage of total” splits your invoice into a specific number of payments. You input the number of invoices you’d like to create, and the Invoice Worksheet automatically calculates the cost for each invoice.
- Set the terms of your invoice. Our drop-down menu lets you select an invoice term that works for you and converts that term into a due date automatically.
- Record an invoice to QuickBooks. The “Record” button at the top of each invoice allows you to easily input the invoice information into QuickBooks. You’ll be prompted to set a class and assign an item to make sure the data in QuickBooks is as accurate as possible.
- Send a payment request. Once your invoices are complete, you can get them in front of your customers by clicking “Send Payment Request”. The Invoice Worksheet will create an email to your primary contact with the invoice attached, and you’ll have the option to add a personalized message.
Why Test Drive These Features?
Even though the Financial and Invoice Worksheets are not live yet, it’s still worth it to experiment with these features. Here’s why you should start using the test drive today:
- Get a head start on learning how the new tools work. Using the test drive will prepare you for when the Financial and Invoice Worksheets go live. You’ll get a chance to figure out the ins and outs of these tools so you’ll be ready to start using them right away.
- See how the Financial and Invoice Worksheets will benefit your business. Since the test drive uses real data from your jobs, you’ll get a clear picture of how these new features will integrate into your existing processes—and how they can simplify your financial management.
- Help to build a better AccuLynx. Within the test drive, there’s an option to give feedback on the Financial and Invoice Worksheets and leave any comments you have about the new features. We’re using this feedback to make sure that our updates meet the needs of our customers and fit seamlessly with their work processes.
If you have questions about the Financial and Invoice Worksheets, or about the test drive capabilities, reach out to your Customer Success Manager.

