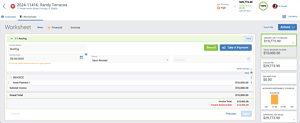
Every roofing business has a different process for invoicing. AccuLynx roofing software created the Invoice Worksheet to complement the Financial Worksheet, helping you easily manage your payment collections process.
With the Invoice Worksheet in AccuLynx, you can:
- Eliminate double data entry by syncing your financial data with accounting programs like QuickBooks and Sage Intacct.
- Streamline the invoice creation and management process.
- Gain more visibility and control over your billing process.
We’ll explain how you can use the Invoice Worksheets, including:
- Getting started with Invoice worksheets
- Preview your invoice
- Collecting and processing payments

Getting started with Invoice Worksheets
In order to use the Invoice Worksheet in AccuLynx, first we recommend setting up your Financial Worksheet for each job. You’ll find the Invoices tab in the Financial Worksheet section.
Read part one of this blog series: The Ultimate Guide to Financial Worksheets in AccuLynx
Creating invoices to request payment
Start by adding an Invoice to your worksheet. You have four ways to invoice your customers.
- Invoice in full: This will bring over the entire Financial Worksheet and allow you to invoice for everything all at once. Note: You can edit or remove items as well.
- Import from Financial Worksheet: This allows you to bring in different sections of the Financial Worksheet to invoice for smaller amounts of the grand total (Ex. invoice for materials, accessories, or labor). A drop down will appear that lets you easily select what you want to invoice. Note: Multiple items can be added.
- Create invoice sequence: This breaks up the total approved job value into equal payments depending on how many invoices you would like created (Ex. break up a $18,000 job into three payments of $6,000).
- Add an item: Type what you are invoicing for along with an assigned dollar value (Ex. downpayment for $10,000). Note: You can add multiple sections with this option.
Every invoice gets a name, date (when the billing process starts), and terms added. From there, you can be flexible.
Regardless of the option(s) you choose, you must click save to see it appear in the “invoice total” box. Deleting an invoice will subtract the dollar amount from the invoice total and cannot be restored.
On the right side of the screen, a summary box displays the “amount left to invoice” which is calculated by subtracting the value of all invoices created from the approved job value. By clicking the down arrow, you’ll see the total invoiced to date, collected, balance due, as well as the approved job value.
Previewing your invoice
This feature enables you to easily view what your customer will see when they receive an invoice. From the preview, you can customize item descriptions or specific item values. You also have the option to preview your invoices during the collection process.

Collecting and processing payments
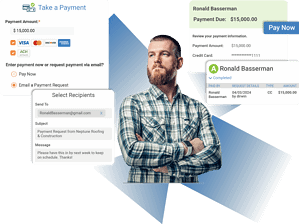
Once you have an invoice ready to go, you can send it to your customer via email, or a “Pay Now” option. AccuLynx makes collecting and processing payments easy.
Collecting credit card or ACH payments with AccuPay
When you preview your invoice, you can click “Email Payment Request” or “Take a Payment,” which will take you to the settings to process it. If you have AccuLynx’s AccuPay feature enabled, you will be able to collect debit, credit, or ACH payments. Note: The person who will be making the payment must be listed as an email recipient, as the AccuPay link is disabled when an email is forwarded. The field will auto populate with the primary contact on the job.
Lastly, if you click the three-dot menu, you can also click “email invoice” and preview it. This will email the invoice PDF to your customer.
Recording an invoice with QuickBooks or Sage Intacct
For QuickBooks and Sage Intacct users, you can click the green “record” button on the page to send the invoice and other job information to your accounting system and apply the payment when you receive it. Payments recorded in QuickBooks or Sage Intacct automatically sync in AccuLynx. Non-integration users can record payments directly in the AccuLynx job file or manually enter any expenses.
As you send invoices and receive payment, it will be tracked in the “Financial Activity” section of the worksheet. With an accurate representation of your jobs’ accounts receivable and accounts payable, you can use AccuLynx’s reporting tools to always keep track of this data.
Start using Invoice Worksheets in AccuLynx today
AccuLynx makes the invoicing process simple with its easy-to-use worksheets. Schedule a demo today to learn more about how to use each worksheet, or for tips on how you can use them more efficiently.

